

This post is Part 1 in a series to share my journey in developing Ruxel, a simple Ray Tracer and 3D Renderer written in Rust, from scratch.
Please see the Series Prelude for more information regarding my Goals for v.0.1.0 of this project.
Ideally by the end of the series, Ruxel will be able to render an image like the one in the header, or better…
Note: Explaining 3D math in depth isn’t the aim of these posts. To learn more about the underlying mathematics and theory please check the books I reference in the Series Prelude.
High-Level Architecture
The long-term objective is that Ruxel will become a big project, and surely it will go through several refactoring phases; however, it’s critical to leverage Rust’s modules’ system from the beginning to keep the project well organized and easier to maintain as it grows larger…
The following diagram presents a high-level view of the architecture of the application, at least for v.0.1.0:
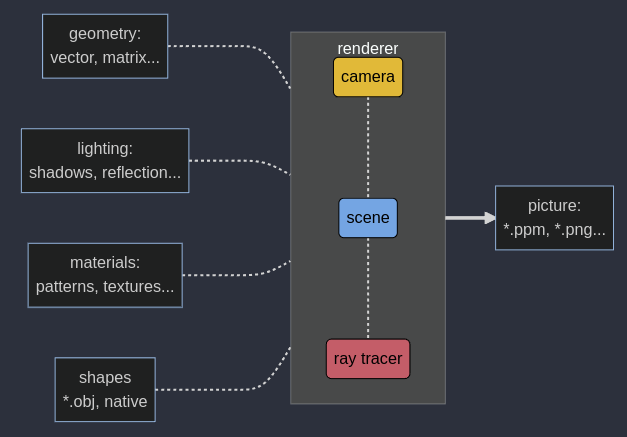 Ruxel high-level architecture diagram - made with https://mermaid.live
In Part 1 and Part 2 of this series, the focus is to create the following:
Part 1:
- Initial project structure:
- Cargo.toml
- Modules tree
- Unit testing
- Geometry module:
- Vectors
- Struct
- Traits
- Implementations
- Points
- Struct
- Traits
- Implementations
- Vectors
Part 2:
- Picture module:
- Canvas
- Struct
- Traits
- Implementations
- Pixel
- Struct
- Traits
- Implementations
- Colors
- Struct
- Traits
- Implementations
- Image
- File
- Canvas
Implementing these modules first, will allow the testing of the basic geometric types and present a first image in a straightforward format.
Project scaffolding
To begin, open the terminal -in my case it’s the Alacritty + Tmux + Fish + Neovim combo- and start a new Cargo project followed by several mkdir and touch commands to get the proper directory structure…
1
2
3
4
5
cargo new ruxel
mkdir src/geometry
mkdir src/picture

-- other commands
If you use Neovim, you can execute shell commands in Neovim’s command line by prepending a
!before the shell commands, for example::!mkdir geometryor:!touch vector.rs.
The initial project structure is the following:
1
2
3
4
5
6
7
8
9
10
11
12
13
14
15
16
17
18
19
20
21
22
23
24
25
26
Rust/ruxel on main [✘] > v0.0.0 | v1.63.0
λ tree -L 4
.
├── Cargo.lock
├── Cargo.toml
├── images
├── LICENSE-APACHE
├── LICENSE-MIT
├── README.md
└── src
├── geometry
│ ├── vector
│ │ └── tests.rs
│ └── vector.rs
├── geometry.rs
├── main.rs
├── picture
│ ├── canvas
│ │ └── tests.rs
│ ├── canvas.rs
│ ├── colors
│ │ └── tests.rs
│ └── colors.rs
└── picture.rs
8 directories, 16 files
This initial scaffolding allows to continue adding modules, and their respective unit tests, in an structured way.
For example, adding a Matrix module would imply creating a new matrix directory, its rust source file and respective tests:
/src/geometry/matrix//src/geometry/matrix.rs/src/geometry/matrix/tests.rs
This would yield the following tree:
1
2
3
4
5
6
7
8
9
10
11
12
13
14
15
16
17
18
19
20
21
22
23
24
25
26
27
28
29
Rust/ruxel on main [✘] > v0.0.0 | v1.63.0
λ tree -L 4
.
├── Cargo.lock
├── Cargo.toml
├── images
├── LICENSE-APACHE
├── LICENSE-MIT
├── README.md
└── src
├── geometry
** │ ├── matrix
** │ │ └── tests.rs
** │ ├── matrix.rs
│ ├── vector
│ │ └── tests.rs
│ └── vector.rs
├── geometry.rs
├── main.rs
├── picture
│ ├── canvas
│ │ └── tests.rs
│ ├── canvas.rs
│ ├── colors
│ │ └── tests.rs
│ └── colors.rs
└── picture.rs
8 directories, 16 files
Rust offers other alternatives to structure projects, like using mod.rs; however, I find the option of using a file and directory name to be the clearer.
Important diagnostic attributes to set up from the beginning:
/src/main.rs
1
#![warn(missing_docs, missing_debug_implementations)]
This will provide linter warnings for missing doc comments used by Rust to generate automatic documentation, and for detecting types missing the Debug trait that provides convenient ways to display type values during development.
And finally, lets make sure all of our files are part of Rust’s module tree:
/src/main.r
1
2
3
4
5
6
7
8
9
/**
The geometry module implements the functionality for Points, Vectors, Matrices, and their transformations
*/
pub mod geometry;

/**
The picture module implements the functionality for Canvas and Colors in order to create an image file.
*/
pub mod picture;
/src/geometry.rs
1
2
3
4
/// Provides data structures, methods and traits for Matrix4 computations.
pub mod matrix;
/// Data structures and methods for Vector3 and Point3 computations.
pub mod vector;
/src/picture.rs
1
2
3
4
5
/// Provides the data structure and implementation of the Color type
pub mod colors;

/// Provides the data structure and implementation of the Canvas type
pub mod canvas;
/src/geometry/vector.rs
1
2
3
// Unit tests for Vector3 and Point3
#[cfg(test)]
mod tests;
/src/picture/canvas.rs
1
2
3
// Canvas Unit Tests
#[cfg(test)]
mod tests;
/src/picture/colors.rs
1
2
3
// Colors Unit Tests
#[cfg(test)]
mod tests;
If everything is properly set up rust-analyzer shouldn’t emit a warning regarding that a file isn’t part of the module tree.
It’s now possible to write some types with their associated functions and bring them into the main.rs scope with full rust-analyzer completion assistance:
/src/main.rs
1
2
3
4
5
6
7
8
9
fn main() {
    let v = Vector3::one();
    let p = Point3::one();

    println!("Vector: {:?} \n Point: {:?}", v, p);

    let c = ColorRgb::red();
    println!("Color: {}", c);
}
Now that the initial scaffolding is done, lets start coding.
Vectors and Points
The module vector contains the types Vector3 and Point3 which are mathematically defined as:
Type definitions
The mathematics definition can be translated into Rust code as follows: /src/geometry/vector.rs
1
2
3
4
5
6
7
8
9
10
11
12
13
14
15
16
17
18
19
20
21
22
23
/// Type representing a geometric 3D Vector with x, y, z components.
#[derive(Debug, Clone, Copy)]
pub struct Vector3<T> {
    /// Component on x axis
    pub x: T,
    /// Component on y axis
    pub y: T,
    /// Component on z axis
    pub z: T,
}

/// Type representing a geometric 3D Point with x, y, z components.
#[derive(Debug, Clone, Copy)]
pub struct Point3<T> {
    /// Component on x axis
    pub x: T,
    /// Component on y axis
    pub y: T,
    /// Component on z axis
    pub z: T,
    /// Component representing the 'weight'
    pub w: T,
}
Both types:
- Are
named-fieldstructures to have access to their components by name (for example:vector.x,point.z). - Have
generic type parametersin their components so to have the flexibility to implement them asf64ori64, etc. - Implement the
common traitsofDebug,CopyandClone. - Are, for the moment, public via
pub.
The most consequential decision here is that both types implement the Copy and Clone common traits.
And the main reason is that all their components are expected to be common numeric types like i64, f64, etc., that don’t own heap resources.
Traits and implementation
Out of the countless ways to implement the desired functionality for these types, the preferred way for this project is to do the following for v.0.1.0
- Focus on implementing
VectorandPointfor common numeric typesf64and for a3D coordinate system. So noVector2<f64>orPoint3<i64>. - Leverage generics and traits as much as possible, keeping in mind future extensibility with little to no refactoring. For example, including Vector2
should be about adding functionality without having to refactor the existing code. - Create a public
EnumnamedAxisthat specifies the axis of a 2D,3D or 4D coordinate system. - Create a public trait named
CoordInitthat specifies the methods for initializing the coordinate system for any type that implements it:- This provides extensibility for other types of vectors and points, like
Vector2orPoint2, or basically any type that requires a coordinate initialization: up, down, back, forward, etc.
- This provides extensibility for other types of vectors and points, like
- Implement
CoordInittrait forVector3andPoint3 - Create a public trait named
VecOpsthat defines common capabilities exclusive for Vectors, likemagnitude,cross product,dot product, etc. - Implement the associated function
new(...)on each type. - Implement
operator overloadingcapabilities to conveniently write common binary operations overVector3andPoint3(to learn more about this topic you can check this post Basic Operator Overloading with Traits):- Add, AddAssign
- Sub, SubAssign
- Mul and Div
- Neg
- Implement the following
common traits:Display,Debug,Default,EqandPartialEq
Axis enumerator
A critical, yet opinionated decision, is how to best handle the initialization of new coordinate-related types, like vectors and points, using a trait with type-associated functions with different signatures. In essence, how to handle this case:
/src/geometry/vector.rs
1
2
3
4
5
6
7
8
9
10
11
12
13
14
trait Init{
        fn new(...);
    }

impl Init for Vector2<T>{
        fn new(x: T, y: T) -> Self{...}
    }
impl Init for Vector3<T>{
        fn new(x: T, y: T, z: T) -> Self{...}
    }
impl Init for Point4<T>{
        fn new(x: T, y: T, z: T, w: T) -> Self{...}
    }
There are various alternatives like using associated functions with the turbofish syntax, however for this project I favor utilizing an enumerator to encapsulate the method parameters:
/src/geometry/vector.rs
1
2
3
4
5
6
7
8
9
10
11
12
13
/**
Enumerator that encapsulates the different coordinate systems used to initialize a Vector or
Point
*/
#[derive(Debug)]
pub enum Axis<U> {
    /// Coordinate system with X and Y axis.
    XY(U, U),
    /// Coordinate system with X, Y and Z axis.
    XYZ(U, U, U),
    /// Coordinate system with X, Y, Z and W axis.
    XYZW(U, U, U, U),
}
And then bring it into scope using a simplified alias:
/src/geometry/vector.rs
1
2
3
4
5
use geometry::vector::{
    Axis,
    Axis::{XY as xy, XYZ as xyz, XYZW as xyzw},
};
With the end result in being able to initialize a new coordinate-related type in a consistent, clear and condensed manner using the new(...) method name:
/src/main.rs
1
2
    let vec3 = Vector3::new(xyz(1.0, 2.0, 3.0));
    let point3 = Point3::new(xyzw(1.0, 2.0, 3.0, 4.0));
It provides the added benefit of extensibility to new types while maintaining a consistent initialization syntax.
So for example, if in the future the Vector2, Vector4, Point2 or any other coordinate-related type requires a new method we would use the same syntax:
/src/main.rs
1
2
3
4
5
6
    let vec2 = Vector2::new(xy(1.0, 2.0));
    let vec3 = Vector3::new(xyz(1.0, 2.0, 3.0));
    let vec4 = Vector4::new(xyzw(1.0, 2.0, 3.0, 4.0));
    let point2 = Point2::new(xy(1.0, 2.0));
    let point3 = Point3::new(xyz(1.0, 2.0, 3.0));
    let point4 = Point4::new(xyzw(1.0, 2.0, 3.0, 4.0));
In the following section, where the CoordInit trait is defined, it’s shown how to utilize the Axis enumerator in the trait function.
CoordInit trait
The main goal of the CoordInit trait is to define the functionality to initialize any coordinate-related type, in its most common ways, but also by in a user-defined way.
In the case of coordinate-related types the most common initializations are: up, down, left, right, forward, back, one and zero.
Also, having a self.equal() method to compare one type against another can be handy.
In Rust, this trait can be defined as follows:
/src/geometry/vector.rs
1
2
3
4
5
6
7
8
9
10
11
12
13
14
15
16
17
18
19
20
21
22
23
/// Trait allows Types with coordinates (x, y, etc.) to be efficiently initialized with common shorthand.
pub trait CoordInit<T, U> {
    /// Return a type with shorthand, for example [0, 0, -1].
    fn back() -> T;
    /// Return a type with shorthand, for example  [0, -1, 0].
    fn down() -> T;
    /// Return true if a type is identical to another, else return false.
    fn equal(self, rhs: Self) -> bool;
    /// Return a type with shorthand, for example  [0, 0, 1].
    fn forward() -> T;
    /// Return a type with shorthand, for example  [-1, 0, 0].
    fn left() -> T;
    /// Return a type with user-defined Axis components.
    fn new(axis: Axis<U>) -> T;
    /// Return a type with shorthand, for example  [1, 1, 1].
    fn one() -> T;
    /// Return a type with shorthand [1, 0, 0].
    fn right() -> T;
    /// Return a type with shorthand [0, 1, 0].
    fn up() -> T;
    /// Return a type with shorthand [0, 0, 0].
    fn zero() -> T;
}
The trait is defined with two generic components <T, U>.
T represents the coordinate-related types (Vector, Points, etc.) that will be initialized, and that will be returned from almost all the functions.
U represents the common type (f64) that will use the Axis enum to initialize the coordinate-related type.
The next step is to implement each of these functions for the specific types that are needed.
As defined above, for v.0.1.0 the focus is only to support types in 3 dimensions and with floating points (f64). However, the framework to make it extensible to other dimensions and primitive data types is already established.
For the full implementation details you can visit Ruxel’s GitHub repository.
Here, I will explain just a couple in its implementation for Vector3<f64>:
fn new(axis: Axis<U>) -> Tfn zero()
The Rust code is the following:
/src/geometry/vector.rs
1
2
3
4
5
6
7
8
9
10
11
12
13
14
15
16
17
18
19
20
21
impl CoordInit<Vector3<f64>, f64> for Vector3<f64> {

    // other type-associated functions

    // new()
    fn new(axis: Axis<f64>) -> Vector3<f64> {
        match axis {
            Axis::XY(x, y) => Vector3 { x, y, z: 0.0 },
            Axis::XYZ(x, y, z) => Vector3 { x, y, z },
            Axis::XYZW(x, y, z, _w) => Vector3 { x, y, z },
        }
    }

    fn zero() -> Self {
        Vector3 {
            x: 0.0,
            y: 0.0,
            z: 0.0,
        }
    }
}
The first line specifies the implementation of the CoordInit trait for the Vector3 type utilizing f64 in its components.
The function fn new(...) receives the Axis<f64> enumerator, performs a match against the supported coordinate systems (XYZ, etc.) and returns the Vector initialized with user-defined or sane values.
In this case, the sane value is to return a Vector3 even if the user inputs a 2D coordinate system.
The function fn zero() returns a Vector3 with all its components with value 0.0.
Operator overloading
To implement operator overloading capabilities it’s necessary to bring the std::ops module into scope and implement the desired traits in each of the types.
/src/geometry/vector.rs
1
2
// Bring overflow operator's traits into scope
use std::ops::{Add, AddAssign, Div, Mul, Neg, Sub, SubAssign}
Binary operations between Vectors and Points need to follow some mathematical logic, summarized in this table:
| Operation | LHS | RHS | Result |
|---|---|---|---|
| Add | V | P | P |
| Add | P | V | P |
| Add | V | V | V |
| Add | P | P | N/A |
| Sub | V | P | N/A |
| Sub | P | V | P |
| Sub | V | V | V |
| Sub | P | P | V |
| Mul | P | Scalar | N/A |
| Mul | V | Scalar | V |
| Mul | V | P | N/A |
| Div | P | Scalar | N/A |
| Div | V | Scalar | V |
| Div | V | P | N/A |
| Neg | V | N/A | -V |
| Neg | P | N/A | N/A |
And hence, it’s only necessary to implement the combinations that yield a logic result. Not implementing the others carries the additional benefit of being stopped by the Rust compiler.
For example, to support the Add operation between Vector3 and Point3 three implementation functions are needed:
1
2
3
4
5
6
7
8
9
10
11
12
13
14
15
16
17
18
19
20
21
22
23
24
25
26
27
28
29
30
31
32
33
34
35
36
37
impl Add<Point3<f64>> for Vector3<f64> {
    type Output = Point3<f64>;

    fn add(self, rhs: Point3<f64>) -> Point3<f64> {
        Point3 {
            x: self.x + rhs.x,
            y: self.y + rhs.y,
            z: self.z + rhs.z,
            w: rhs.w,
        }
    }
}

impl Add<Vector3<f64>> for Point3<f64> {
    type Output = Point3<f64>;

    fn add(self, rhs: Vector3<f64>) -> Point3<f64> {
        Point3 {
            x: self.x + rhs.x,
            y: self.y + rhs.y,
            z: self.z + rhs.z,
            w: self.w,
        }
    }
}

impl Add for Vector3<f64> {
    type Output = Vector3<f64>;

    fn add(self, rhs: Self) -> Vector3<f64> {
        Vector3 {
            x: self.x + rhs.x,
            y: self.y + rhs.y,
            z: self.z + rhs.z,
        }
    }
}
Check the GitHub repository for the full implementation of all the operators.
Once all the binary operators are overloaded, it’s possible to ‘chain’ Vector and Point operations like with any common primitive, which is extremely useful and convenient:
src/main.rs
1
2
3
4
5
6
7
8
9
10
11
12
13
14
15
    let v1 = Vector3::new(xyz(2.0, 3.5, 4.0));
    let v2 = Vector3::new(xyz(3.0, 7.5, 8.0));
    let v3 = Vector3::new(xyz(2.55555, 7.88888, 9.34343));
    let v4 = Vector3::new(xyz(2.55553, 7.88887, 9.34342));
    let p1 = Point3::new(xyz(2.5, 3.5, 4.5));
    let p2 = Point3::new(xyz(3.0, 7.0, 8.0));
    let p3 = Point3::new(xyz(2.55555, 7.88888, 9.34343));
    let p4 = Point3::new(xyz(2.55553, 7.88887, 9.34342));


    println!("{:?}", v1 + v4 - v1 - v3 + (v2 - v4) / 1.522445523);
    println!("{:?}", v3 + p4 + v1);
    println!("{:?}", p1 - p2 / 3.7626374);
    println!("{:?}", p2 - v1);
    println!("{:?}", v2 + v1);
Common traits
The Rust API Guidelines offer an extensive explanation of the recommendations on how to develop APIs for the language in order to produce idiomatic code.
One of the key objectives of this project is to abide to the standards as much as possible.
As the project evolves, more common traits will likely be implemented as needed, and only if it makes sense to do so.
For starters, these are the common traits that are implemented at this stage for the Vector3 and Point3 types:
| Type | Common Trait |
|---|---|
| Vector3 | Eq, PartialEq, Display, Debug, Clone, Copy, Default |
| Point3 | Eq, PartialEq, Display, Debug, Clone, Copy, Default |
The default implementations can be derived by decorating the struct definitions with the #[derive(Debug, Copy,...)] attributes.
However, only in the particular cases of Display and Default a manual implementation will be written to modify the default behavior:
Default implementations via derive:
src/geometry/vector.rs
1
2
3
4
5
6
7
8
#[derive(Debug)]
pub enum Axis<U>

#[derive(Debug, Clone, Copy, Eq, PartialEq)]
pub struct Vector3<T>

#[derive(Debug, Clone, Copy, Eq, PartialEq)]
pub struct Point3<T>
And now the manual implementations:
src/geometry/vector.rs
1
2
3
4
5
6
7
8
9
10
11
12
13
14
15
16
17
18
19
20
21
22
23
24
25
26
27
28
29
30
31
32
33
34
35
36
37
impl Display for Vector3<f64> {
    fn fmt(&self, f: &mut std::fmt::Formatter<'_>) -> std::fmt::Result {
        let s = format!("v: [{:^5.2},{:^5.2},{:^5.2}]", self.x, self.y, self.z);
        f.write_str(&s)
    }
}

impl Display for Point3<f64> {
    fn fmt(&self, f: &mut std::fmt::Formatter<'_>) -> std::fmt::Result {
        let s = format!(
            "p: [{:^5.2},{:^5.2},{:^5.2},{:^5.2}]",
            self.x, self.y, self.z, self.w
        );
        f.write_str(&s)
    }
}

impl Default for Point3<f64> {
    fn default() -> Self {
        Self {
            x: 0.0,
            y: 0.0,
            z: 0.0,
            w: 1.0,
        }
    }
}

impl Default for Vector3<f64> {
    fn default() -> Self {
        Self {
            x: 0.0,
            y: 0.0,
            z: 0.0,
        }
    }
}
Even when Default for Vector3 implements Rust’s defaults of filling the value with 0.0’s for f64, it’s convenient to have the manual implementation at hand for testing purposes.
Common vector operations
The last important implementations that are needed for the Vector type are those regarding their common mathematical operations:
- Calculate magnitude
- Normalize the vector
- Calculate dot product
- Calculate cross product
- Obtain the minimum component in the vector
- Obtain the maximum component in the vector
- Return components of the vector by name and index
These capabilities can be defined using a public trait named VecOps<T>, with a generic parameter in order to extend its implementation for types other than Vector3<f64>:
src/geometry/vector.rs
1
2
3
4
5
6
7
8
9
10
11
12
13
14
15
16
17
18
19
/// A trait that encapsulates common Vector Operations.
pub trait VecOps<T> {
    /// Computes the magnitude of a Vector.
    fn magnitude(&self) -> f64;
    /// Returns the vector normalized (with magnitude of 1.0)
    fn normalized(&mut self) -> Self;
    /// Returns the Dot Product of two Vectors.
    fn dot(lhs: T, rhs: T) -> f64;
    /// Returns the Cross Product of two Vectors.
    fn cross(lhs: T, rhs: T) -> T;
    /// Returns the Smallest component in the Vector.
    fn min_component(&self) -> (i8, char, f64);
    /// Returns the Largest component in the Vector.
    fn max_component(&self) -> (i8, char, f64);
    /// Returns the component of the Vector by index. this(1)
    fn this(&self, index: i8) -> Option<(i8, char, f64)>;
    /// Returns the component of the Vector by name. this_n('x')
    fn this_name(&self, index: char) -> Option<(i8, char, f64)>;
}
As with the CoordInit trait, the implementation needs to be defined for each function within an impl block for Vector3<f64>:
1
2
3
4
5
6
7
8
9
10
11
12
13
14
15
impl VecOps<Vector3<f64>> for Vector3<f64> {
    fn magnitude(&self) -> f64 {
        (self.x.powf(2.0) + self.y.powf(2.0) + self.z.powf(2.0)).sqrt()
    }

    fn normalized(&mut self) -> Self {
        let magnitude = self.magnitude();
        Self {
            x: self.x / magnitude,
            y: self.y / magnitude,
            z: self.z / magnitude,
        }
    }

    // other functions in the VecOps<T> trait
Unit tests
Now that the basic implementations and capabilities for Vector3 and Point3 are created it’s time to perform unit tests to ensure that there are no issues or bugs in the code.
As described at the beginning, the tests for each of the modules are implemented in the test.rs under the module’s directory.
In the case of Vector3 and Point3, the file is located in src/geometry/vector/tests.rs.
There are 5 tests that will be executed to validate our types:
- Vector and Point construction integrity
- Vector and Point operator overloading integrity
- Vector common operations integrity
- Rocket launch simulator, based on The Ray Tracer Challenge book1
First step is to bring into scope the vector module and use the alias for the Axis enumerator:
src/geometry/vector/tests.rs
1
2
3
4
5
/// Unit testing for Vector3 and Point3 types
use super::*;

use super::Axis::XYZ as xyz;
Second we define the tests functions:
1
2
3
4
5
6
7
8
9
10
11
12
13
14
15
16

#[test]
// This test validates the construction of the Vector3 and Point3 types
fn vector_and_point_construction_integrity() {}

#[test]
// This test validates the operation overloading Add, Sub, Div, Equality, Mul, Neg, AddAssign, SubAssign  for the Vector3 and Point3
fn vector_and_point_operator_overloading_integrity() {}

#[test]
// This test validates the implementation of the fuctions in the VecOps trait
fn vector_common_operations_integrity() {}

#[test]
// This test validates integrity by simulating a rocket launch
fn simulate_rocket_lauch() {}
Each test is basically a set of assert!() and assert_eq!() macros, as well as println!() statements.
The testing file is pretty extensive, so in this post I will only show the code for vector_common_operations_integrity() and the ‘simulate_rocket_lauch()’ tests:
src/geometry/vector/tests.rs
1
2
3
4
5
6
7
8
9
10
11
12
13
14
15
16
17
18
19
20
21
22
23
24
#[test]
// This test validates the implementation of the fuctions in the VecOps trait
fn vector_common_operations_integrity() {
    // Magnitude
    let v1 = Vector3::new(xyz(1.0, 2.0, 3.0));
    assert_eq!(v1.magnitude(), 14f64.sqrt());
    // Normalization
    let mut v2 = v1;
    assert_eq!(v2.normalized().magnitude(), 1f64);
    // Dot product
    let a = Vector3::new(xyz(1.0, 2.0, 3.0));
    let b = Vector3::new(xyz(2.0, 3.0, 4.0));
    assert_eq!(Vector3::dot(a, b), 20f64);
    // Cross product
    assert_eq!(Vector3::cross(a, b), Vector3::new(xyz(-1.0, 2.0, -1.0)));
    assert_eq!(Vector3::cross(b, a), Vector3::new(xyz(1.0, -2.0, 1.0)));
    // Min, Max and Get Components
    assert_eq!(a.min_component(), (0, 'x', 1.0));
    assert_eq!(a.max_component(), (2, 'z', 3.0));
    assert_eq!(a.this(0).unwrap(), (0, 'x', 1.0));
    assert_eq!(a.this(9), None);
    assert_eq!(b.this(b.min_component().0).unwrap(), (0, 'x', 2.0));
    assert_eq!(a.this_name('z').unwrap(), (2, 'z', 3.0));
}
Running the test using cargo test vector_common_operations_integrity yields a positive result:
1
2
3
4
5
 λ cargo test vector_common_operations_integrity
running 1 test
test geometry::vector::tests::vector_common_operations_integrity ... ok

test result: ok. 1 passed; 0 failed; 0 ignored; 0 measured; 8 filtered out; finished in 0.00s
And now, the rocket launch simulation that brings everything together in a single test. To validate, the test will print the coordinates of the rocket based on initial launching conditions and the environment (gravity and wind).
The expectation is to see the data of a parabolic launch:
xaxis getting larger.yaxis getting larger and then going down to0.0.
1
2
3
4
5
6
7
8
9
10
11
12
13
14
15
16
17
18
19
20
21
22
23
24
25
26
27
28
29
30
31
32
33
34
35
36
37
38
39
40
41
42
43
44
45
46
#[test]
// This test validates integrity by simulating a rocket launch
fn simulate_rocket_lauch() {
    #[derive(Debug)]
    struct Projectile {
        position: Point3<f64>,
        velocity: Vector3<f64>,
    }

    struct Environment {
        gravity: Vector3<f64>,
        wind: Vector3<f64>,
    }

    let mut proj = Projectile {
        position: Point3::up(),
        velocity: Vector3::new(xyz(1.0, 1.0, 0.0)).normalized(),
    };

    let env = Environment {
        gravity: Vector3::down() / 10f64,
        wind: Vector3::left() / 100f64,
    };

    fn tick<'a, 'b>(env: &'a Environment, proj: &'b mut Projectile) -> &'b mut Projectile {
        proj.position = proj.position + proj.velocity;
        proj.velocity = proj.velocity + env.gravity + env.wind;
        proj
    }

    println!(
        "Launch position: - x: {:^5.2}, y: {:^5.2}, z: {:^5.2}",
        proj.position.x, proj.position.y, proj.position.z
    );
    while proj.position.y > 0.0 {
        tick(&env, &mut proj);
        if proj.position.y <= 0.0 {
            break;
        }
        println!(
            "Projectile position - x: {:^5.2}, y: {:^5.2}, z: {:^5.2}",
            proj.position.x, proj.position.y, proj.position.z
        );
    }
    println!("========================== End");
}
To view the println!() results it’s necessary to run cargo test with the -- --nocapture argument:
1
2
3
4
5
6
7
8
9
10
11
12
13
14
15
16
17
18
19
20
21
22
23
24
25
26
27
28
Rust/ruxel on main [!] > v0.0.0 | v1.63.0
λ cargo test simulate_rocket_lauch -- --nocapture
Finished test [unoptimized + debuginfo] target(s) in 0.00s
Running unittests src/main.rs (target/debug/deps/ruxel-6b30efdff903fb79)
running 1 test
Launch position: - x: 0.00 , y: 1.00 , z: 0.00
Projectile position - x: 0.71 , y: 1.71 , z: 0.00
Projectile position - x: 1.40 , y: 2.31 , z: 0.00
Projectile position - x: 2.09 , y: 2.82 , z: 0.00
Projectile position - x: 2.77 , y: 3.23 , z: 0.00
Projectile position - x: 3.44 , y: 3.54 , z: 0.00
Projectile position - x: 4.09 , y: 3.74 , z: 0.00
Projectile position - x: 4.74 , y: 3.85 , z: 0.00
Projectile position - x: 5.38 , y: 3.86 , z: 0.00
Projectile position - x: 6.00 , y: 3.76 , z: 0.00
Projectile position - x: 6.62 , y: 3.57 , z: 0.00
Projectile position - x: 7.23 , y: 3.28 , z: 0.00
Projectile position - x: 7.83 , y: 2.89 , z: 0.00
Projectile position - x: 8.41 , y: 2.39 , z: 0.00
Projectile position - x: 8.99 , y: 1.80 , z: 0.00
Projectile position - x: 9.56 , y: 1.11 , z: 0.00
Projectile position - x: 10.11, y: 0.31 , z: 0.00
========================== End
test geometry::vector::tests::simulate_rocket_lauch ... ok
test result: ok. 1 passed; 0 failed; 0 ignored; 0 measured; 8 filtered out; finished in 0.00s
As expected, the test passed. This means that our Vector3 and Point3 implementations have been successful.
And with that we conclude Part 1 of this series!
Next steps
In Part 2 we will focus on:
- Creating the
Color,PixelandCanvastypes. - Defining and implementing their
traits. - Writing and executing their
unit tests. - And finally, producing the first image.
Links, references and disclaimers:
Header Photo by Rohit Choudhari on Unsplash
Books:
Buck, Jamis. (2019). The ray tracer challenge: A test-driven guide to your first 3D renderer. The Pragmatic Programmers. ↩